
Welcome to ForkLift 4, your all-in-one solution for efficient file management and seamless file transfers, across multiple platforms and services. We understand that accessing, organizing, synchronizing, and sharing your files should be hassle-free, especially as the landscape of file sharing evolves with the increasing importance of cloud service providers such as Dropbox, Amazon S3, Google Drive, and OneDrive.
ForkLift combines the power of a robust file manager with versatile file transfer capabilities, seamlessly bridging the gap between your local and remote files. Whether you're dealing with cloud services or more traditional FTP and SFTP servers, ForkLift streamlines your file management and transfers, making them smoother than ever.
ForkLift 4.4 and later require macOS Sonoma (macOS 14.6) or later. Previous ForkLift 4 versions require macOS Monterey (macOS 12.4) or later.
ForkLift 4.3.4 and later are compatible with macOS Tahoe (macOS 26), while earlier versions are not.
IMPORTANT: If you already have ForkLift 3 installed on your Mac and want to keep it, you don't need to remove it. You can have ForkLift 3 and ForkLift 4 installed together and use them both at the same time if you like.
To install ForkLift 4:
IMPORTANT: If you decide to remove one of the ForkLift versions later, avoid using an App Deleter application for this task. These applications often delete supporting files for both versions, resulting in the loss of settings and favorites in both copies. Instead, to delete one version, just move it to the Trash.
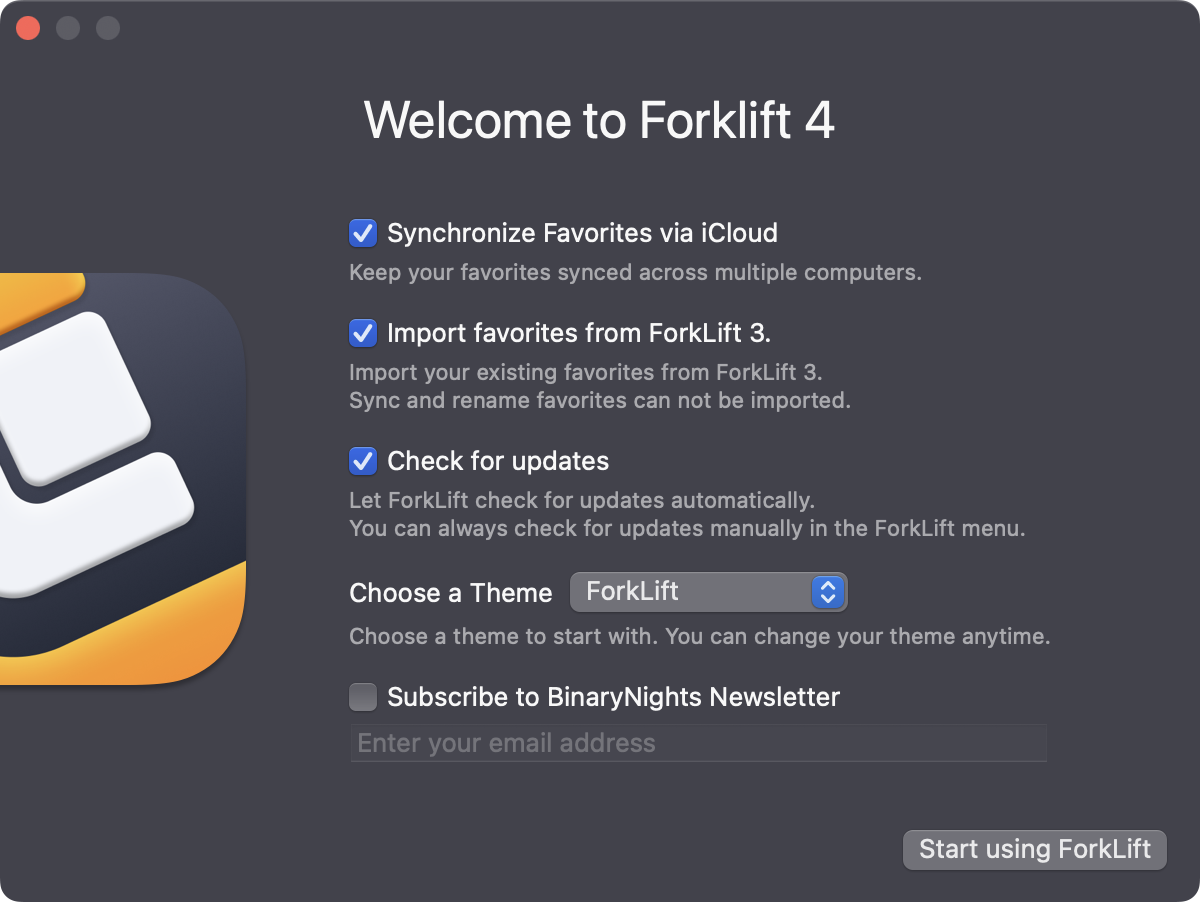
After launching ForkLift 4 for the first time, you can configure initial settings in the Welcome Window. These settings can be adjusted later in the Settings of ForkLift.
In the Registration window that appears after setting up ForkLift, you have the following options:
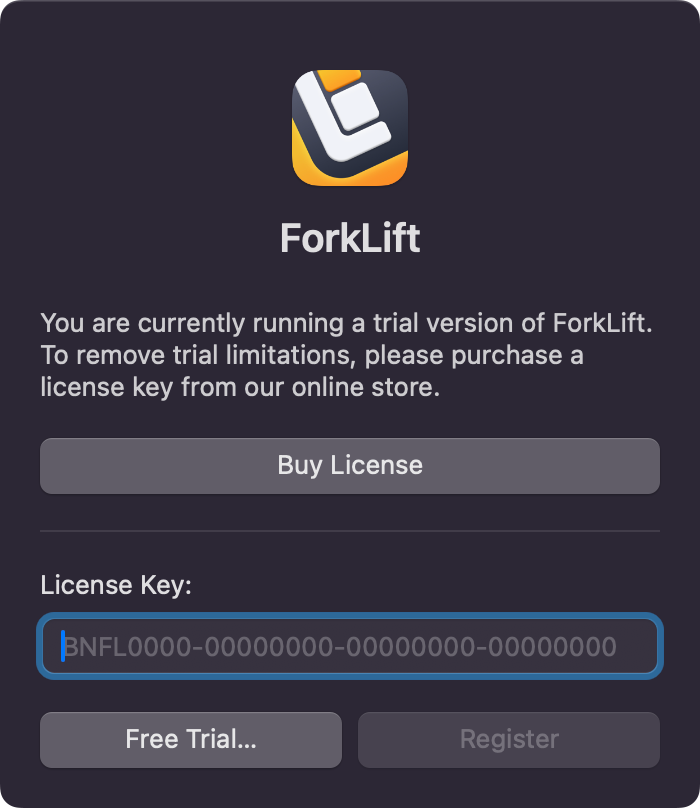
You have the opportunity to thoroughly test ForkLift to see whether it aligns with your preferences and meets your specific requirements. This way, you can explore its features and functionality to determine if it's the right fit for your needs before committing to regular use.
If you want to test ForkLift without a license key, then click the "Free Trial" button.
If you find that ForkLift aligns with your needs and you wish to continue using it, we kindly ask you to purchase a valid license key.
You can purchase a license:
After purchasing a license, enter your license key into the License Key field within the Registration Window, and click the "Register" button.
You can access the Registration Window at any time through the "Purchase" menu within ForkLift. Ensure that you input the license key exactly as it appears in the Confirmation Email. If copying and pasting proves ineffective, manually enter the key, ensuring the use of hyphens (-) instead of em dashes (–) to separate the blocks of the license key.
ForkLift licenses are lifetime licenses with a set length of free updates. With the ForkLift lifetime license, you get free software updates for 1 or 2 years, depending on your choice. Once that period ends, you can keep using the latest version of ForkLift covered by your license indefinitely, for as long as that version remains compatible with your macOS and hardware. To continue receiving new updates, you will need to purchase a new license.
After registering ForkLift with your license key, you can check the validity of your license by navigating to ForkLift > About ForkLift in the menu of ForkLift.
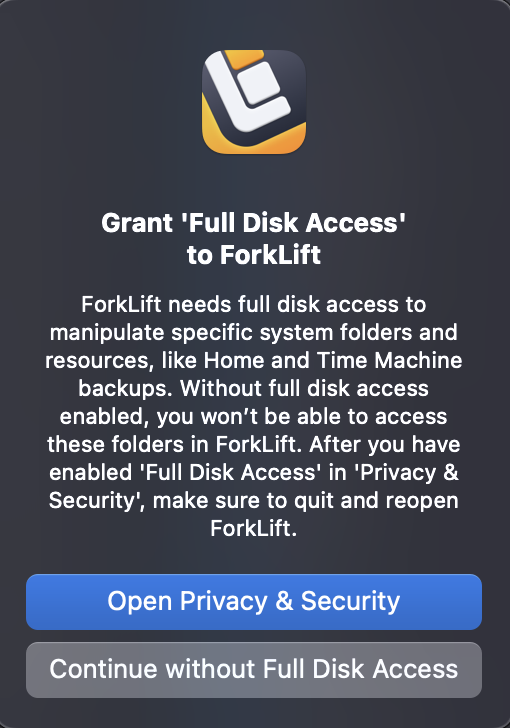
Be sure to give ForkLift Full Disk Access when it requests it. To enable Full Disk Access, simply follow the instructions in the pop-up window. Full Disk Access is essential for unlocking ForkLift's full potential. Without it, you won't be able to access attached drives, your Desktop, Downloads, or Documents folders, and you will experience limitations in drag-and-drop operations, among other things.
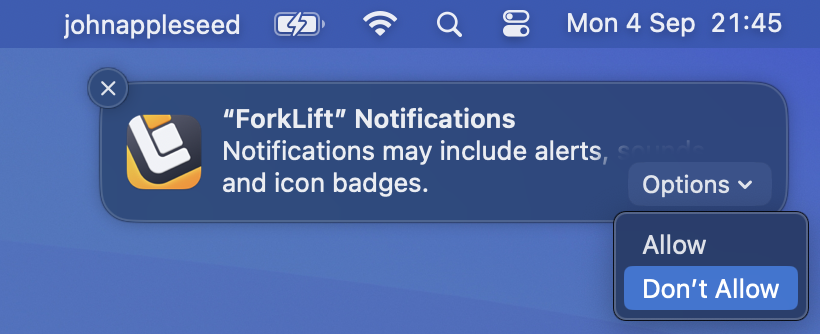
After launching ForkLift, a notification will appear in the top-right corner of your screen, requesting permission for ForkLift to send notifications. Be sure to grant permission. If you choose not to enable notifications at this time, you can do so later in the System Settings.
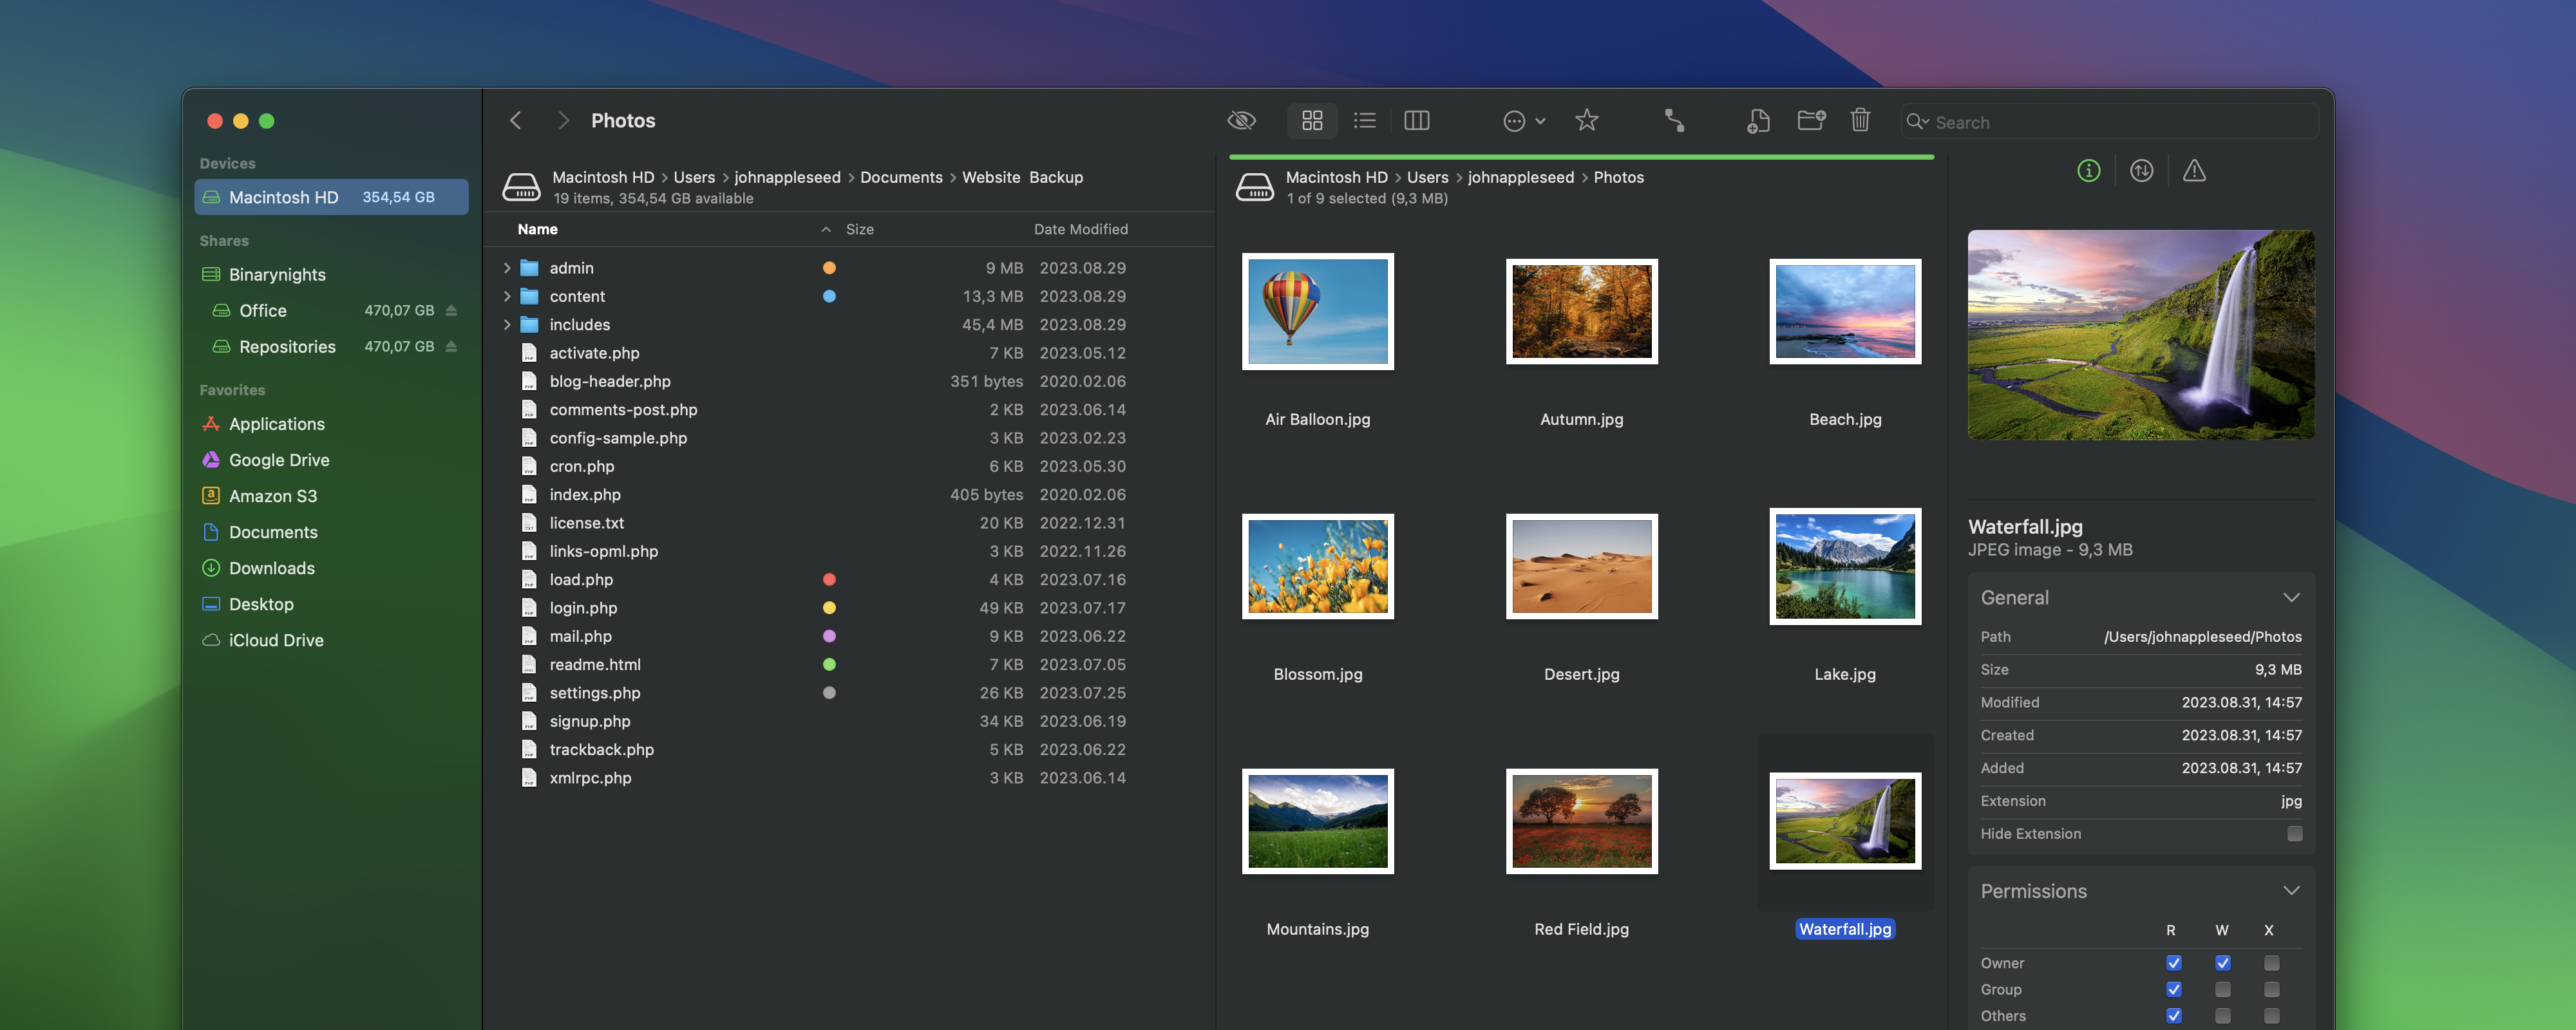
ForkLift is a dual pane file manager and file transfer client. Two panes in file managers and FTP clients are incredibly useful because they allow users to view and interact with two separate folders simultaneously. This design enhances productivity by simplifying file transfers, enabling easy comparison and synchronization between two locations, and streamlining tasks such as copying, moving, and organizing files. It reduces the need to switch back and forth between folders, making file management more efficient and intuitive.
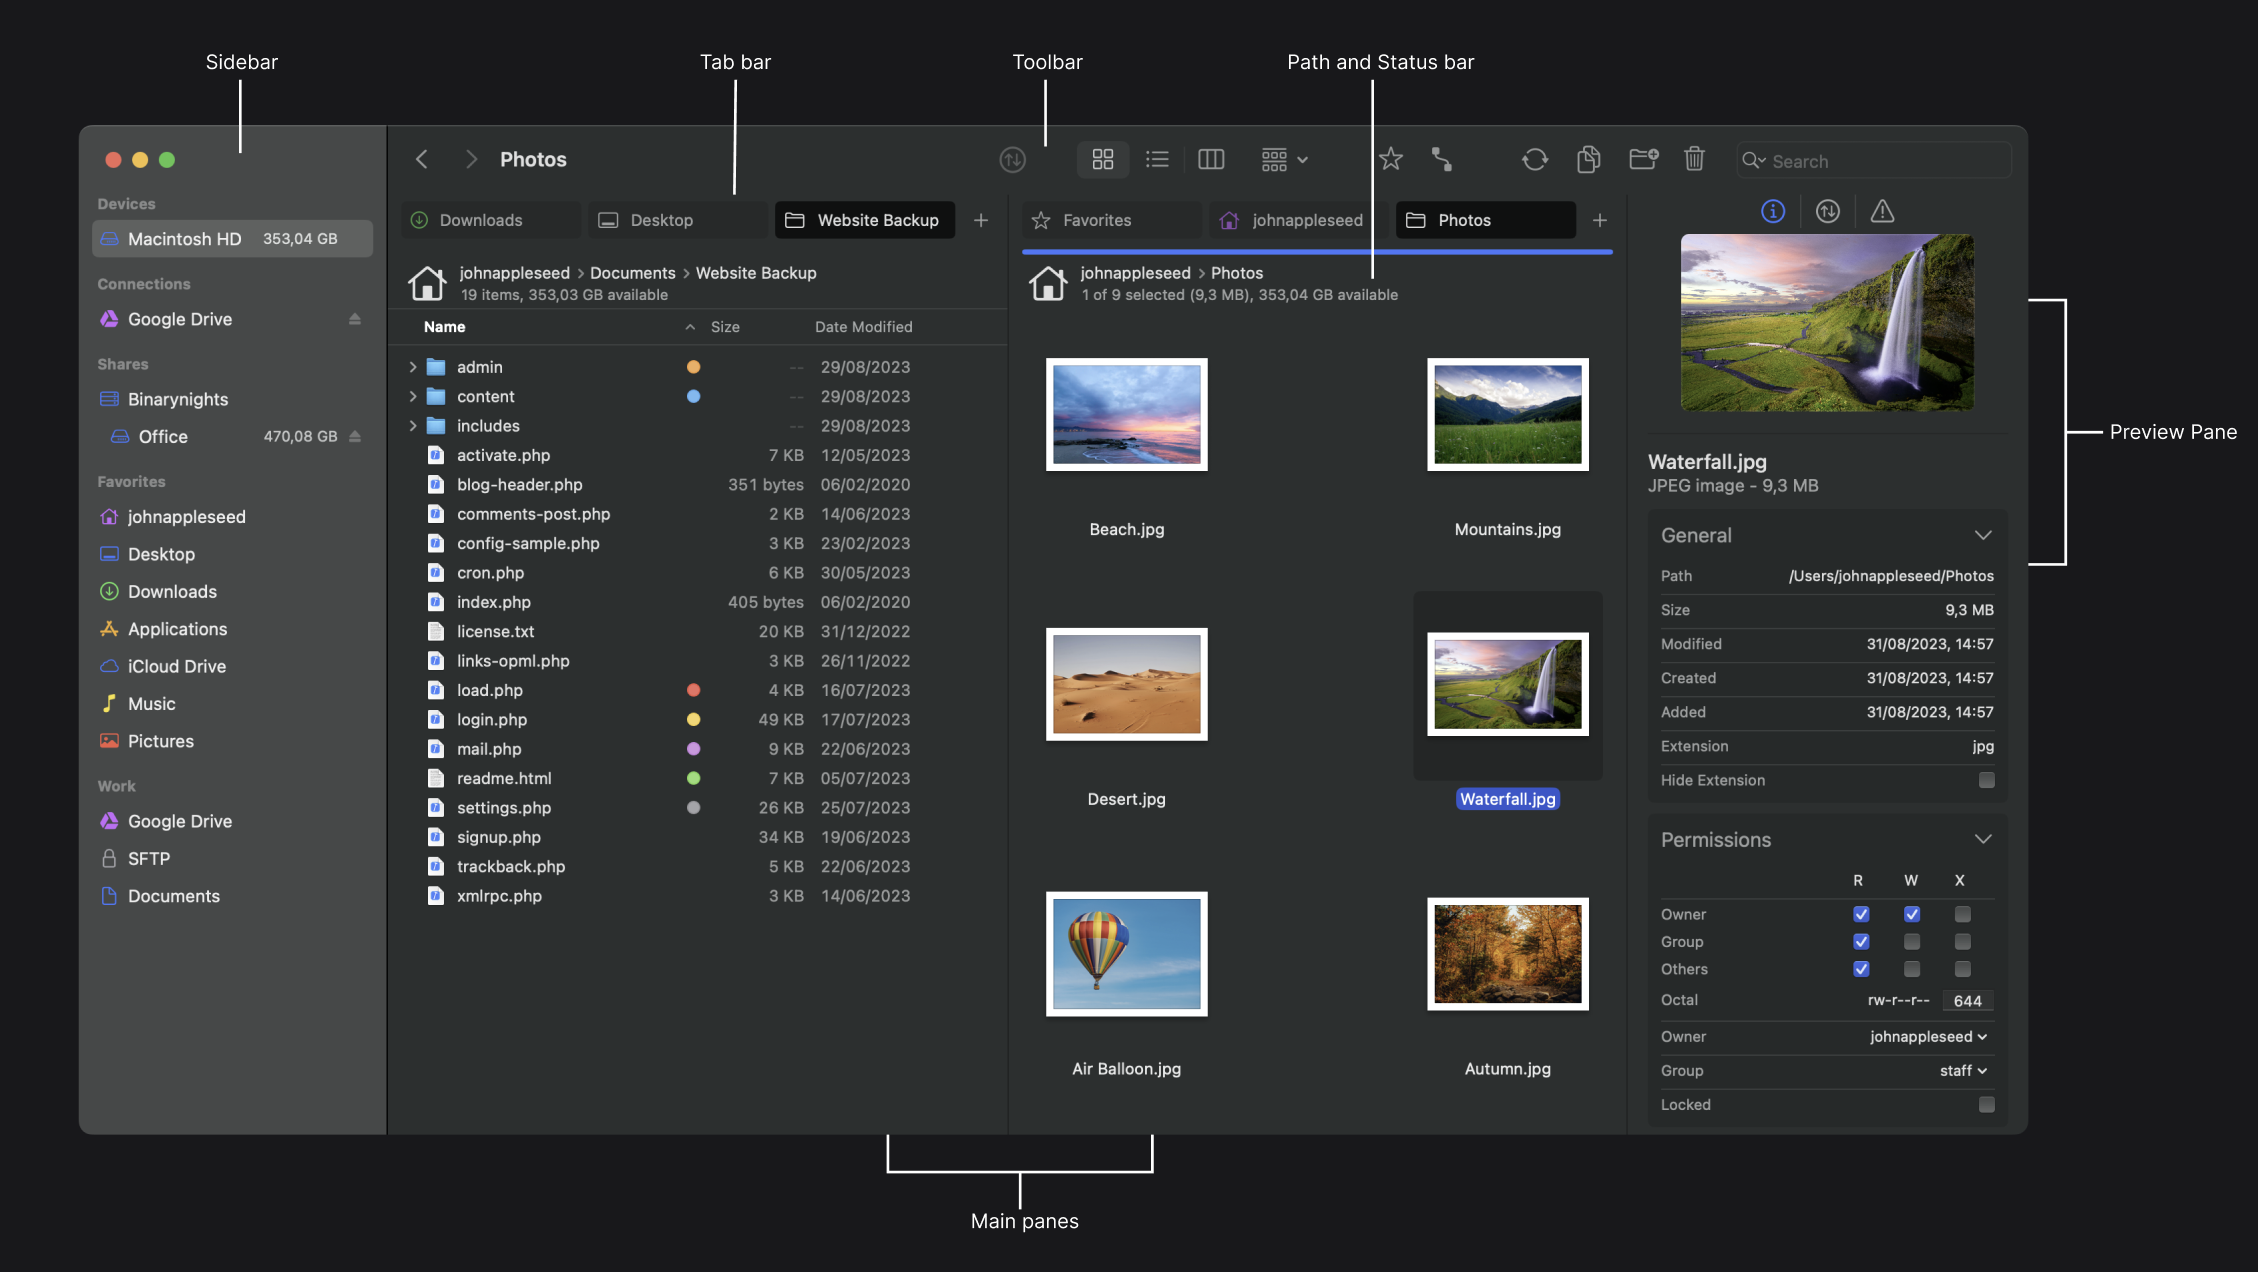
Many elements of the GUI can be toggled on or off via the View menu. You have three view options to choose from: list, column, and icon. You can arrange the panes either vertically or horizontally, and even select to display a single pane if desired.
In ForkLift 4, you have the freedom to choose from some predefined themes. You can also use the standard Dark and Light themes or select the Default theme that automatically follows the appearance of macOS. Additionally, you can create and use your own themes, which can be managed under ForkLift > Settings > Themes.
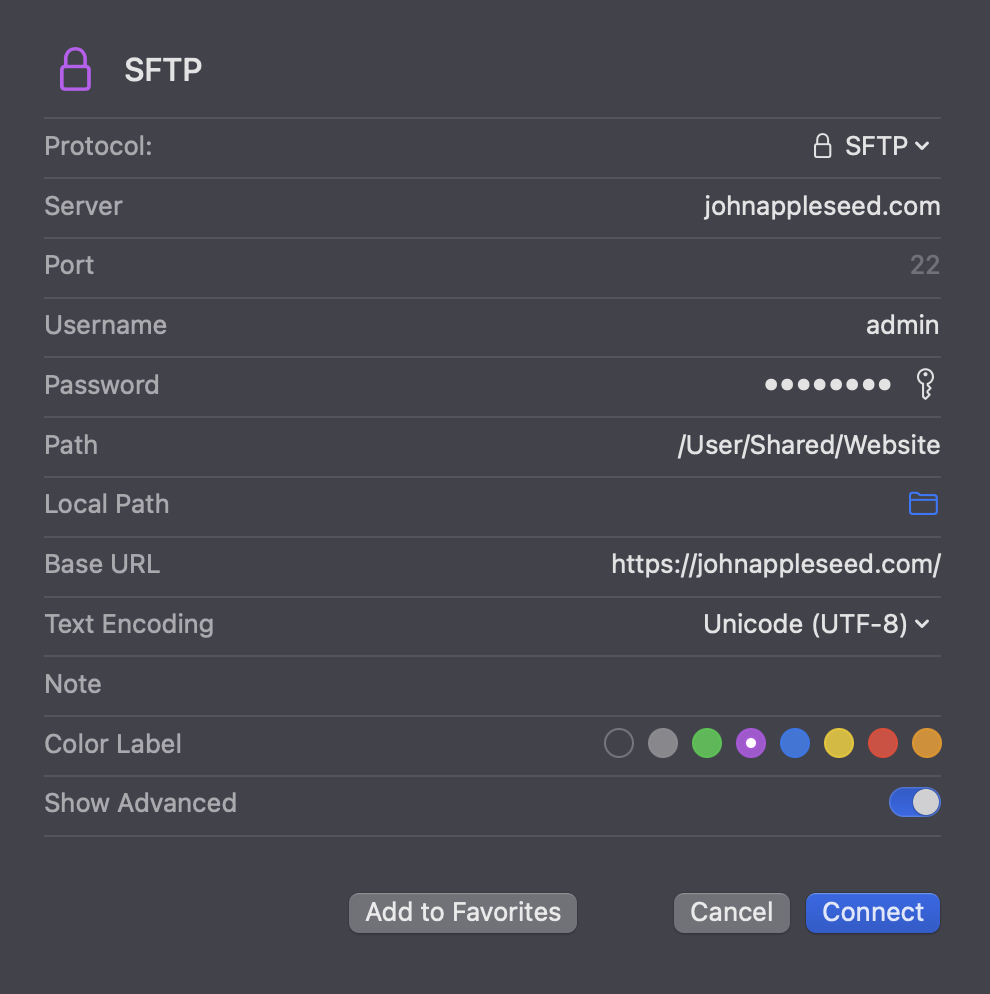
ForkLift is a robust file manager and an FTP client. However, the term "FTP client" doesn't fully capture the capabilities of ForkLift, as it allows you to connect to remote and local locations using a wide range of protocols, including:
You can connect to remote locations from the Connect Panel. The required credentials for connection vary depending on the chosen protocol. Typically, you will need to provide the address of the target location along with a username and password combination for authentication.
You can connect in a very similar way using almost all other protocols, except for the cloud service providers.
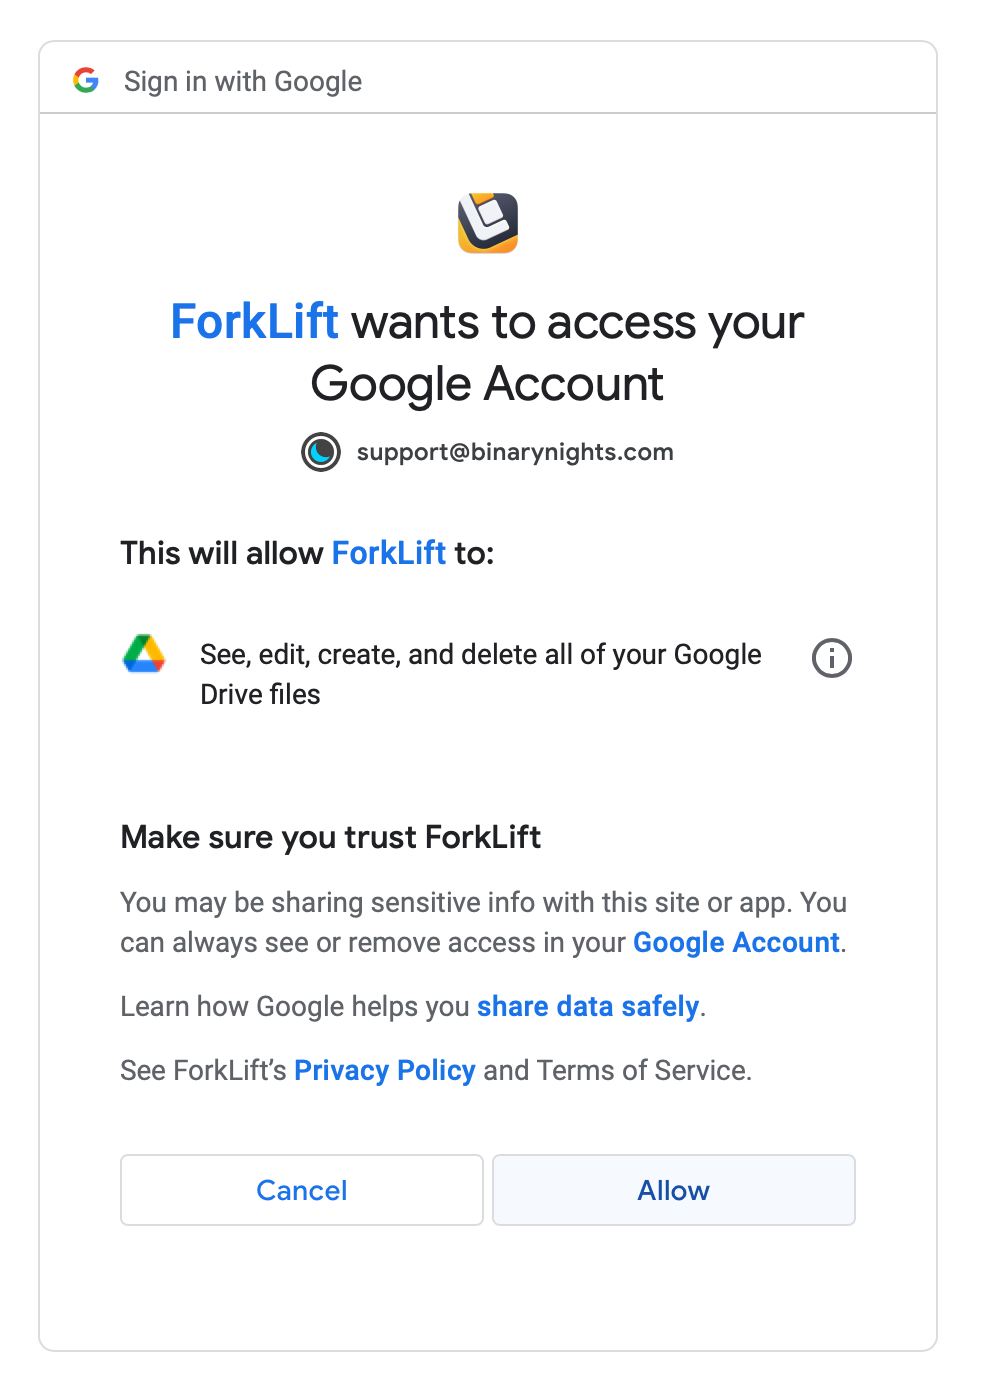
To connect to cloud service providers like Google Drive, OneDrive, or Dropbox, follow these steps:
In ForkLift, file management becomes remarkably straightforward, not only due to its dual-pane interface but also because of the comprehensive set of features and tools that ForkLift offers. In this section, we will focus on fundamental file management actions to help you get started quickly. Keep in mind that ForkLift offers a wide range of advanced file management options beyond what's covered here.
Navigating your folder structure in ForkLift is straightforward. To access a folder, simply double-click it or select it and use the Command-Down Arrow keyboard shortcut. If you want to go back to the parent folder, then click the Back button in the toolbar, or use the Command-Up Arrow keyboard shortcut. You can also use the favorites in the sidebar or the sections of the path bar to navigate.
To open a file, just double-click the file, or select it and use the Command-Down Arrow keyboard shortcut. You can also open a selected file by choosing "Open" or "Open with" from the right-click context menu or the File menu.
To create a new empty folder, simply select File > New Folder from the menu.
If you wish to move selected items into the newly created folder, choose "File > New Folder with Selection" from the menu.
ForkLift allows you to generate a new, empty file within any folder, even when connected to remote volumes. To create a new file, select File > New File from the menu.
You can use various attributes like Name, Date, Size, and more to effectively organize your files and folders.
To copy files and/or folders, first open the two locations you wish to copy between using the two panes in ForkLift.
You can use different methods to copy the selected items from the active pane into the opposite, inactive pane:
To make a copy of an item within the same folder, select the item and choose File > Duplicate or use the Command–D keyboard shortcut.
To move files and/or folders, first open the two locations you wish to move between using the two panes in ForkLift.
You can use different methods to move the selected items from the active pane into the opposite, inactive pane:
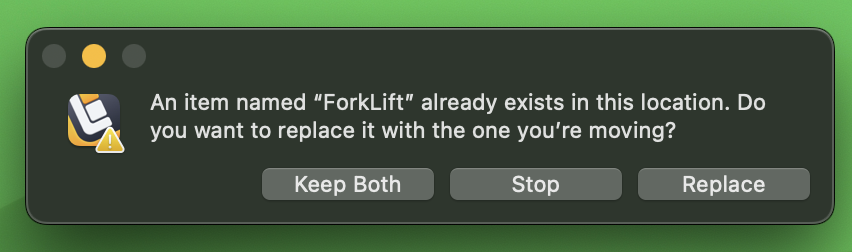
If a conflict arises during a copy or move operation, ForkLift will present you with options to resolve the issue and choose what to do with the conflicting files or folders.
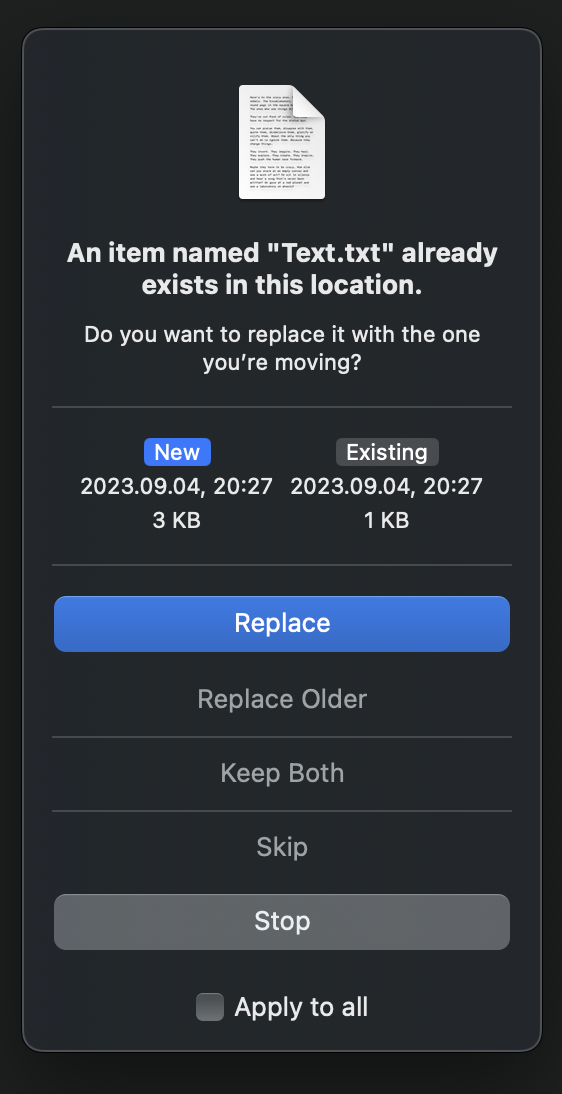
In the case of Files, you can choose from the options:
The "Replace Older" option replaces the item with the older modification date with the item having the newer modification date.
For folders, you can also select "Merge." This option tries to combine the contents of both folders. If there are conflicts with subitem names inside the folder, a conflict window will appear again for you to resolve.
Drag items over the Trash can in the Dock or use the Delete toolbar button. You can also select "Move to Trash" from the right-click context menu or the Commands menu. The Command-Backspace keyboard shortcut accomplishes this as well.
To delete items permanently without using the Trash, hold down the Option key and select "Delete" from the right-click context menu or the Commands menu. The Command-Option-Backspace keyboard shortcut also permanently deletes selected items.
Before permanently deleting an item, ForkLift always asks for confirmation to ensure you don't delete items accidentally.
Note that moving items to the Trash is not available on remote volumes. In such cases, the "Move to Trash" option is automatically replaced by "Delete."
ForkLift offers two search engines: its own search engine and macOS's Spotlight search.
ForkLift's search method employs brute-force to find items matching your criteria. It scans through all files one by one within the active pane's location. This comprehensive search can take more time but also works seamlessly with remote connections. Enabling the "Search in Subfolders" option extends the search to all subfolders within the selected location.
Spotlight search utilizes Finder's metadata, delivering almost instant results. It not only searches by file name but also examines file content for matches. Spotlights Search only works locally.
Synchronization, or syncing, helps you keep your files and folders up-to-date on different devices and platforms, making manual transfers unnecessary and preventing data inconsistencies.
You have the ability to synchronize between any locations that you can open in ForkLift, including folders, drives, and remote connections.
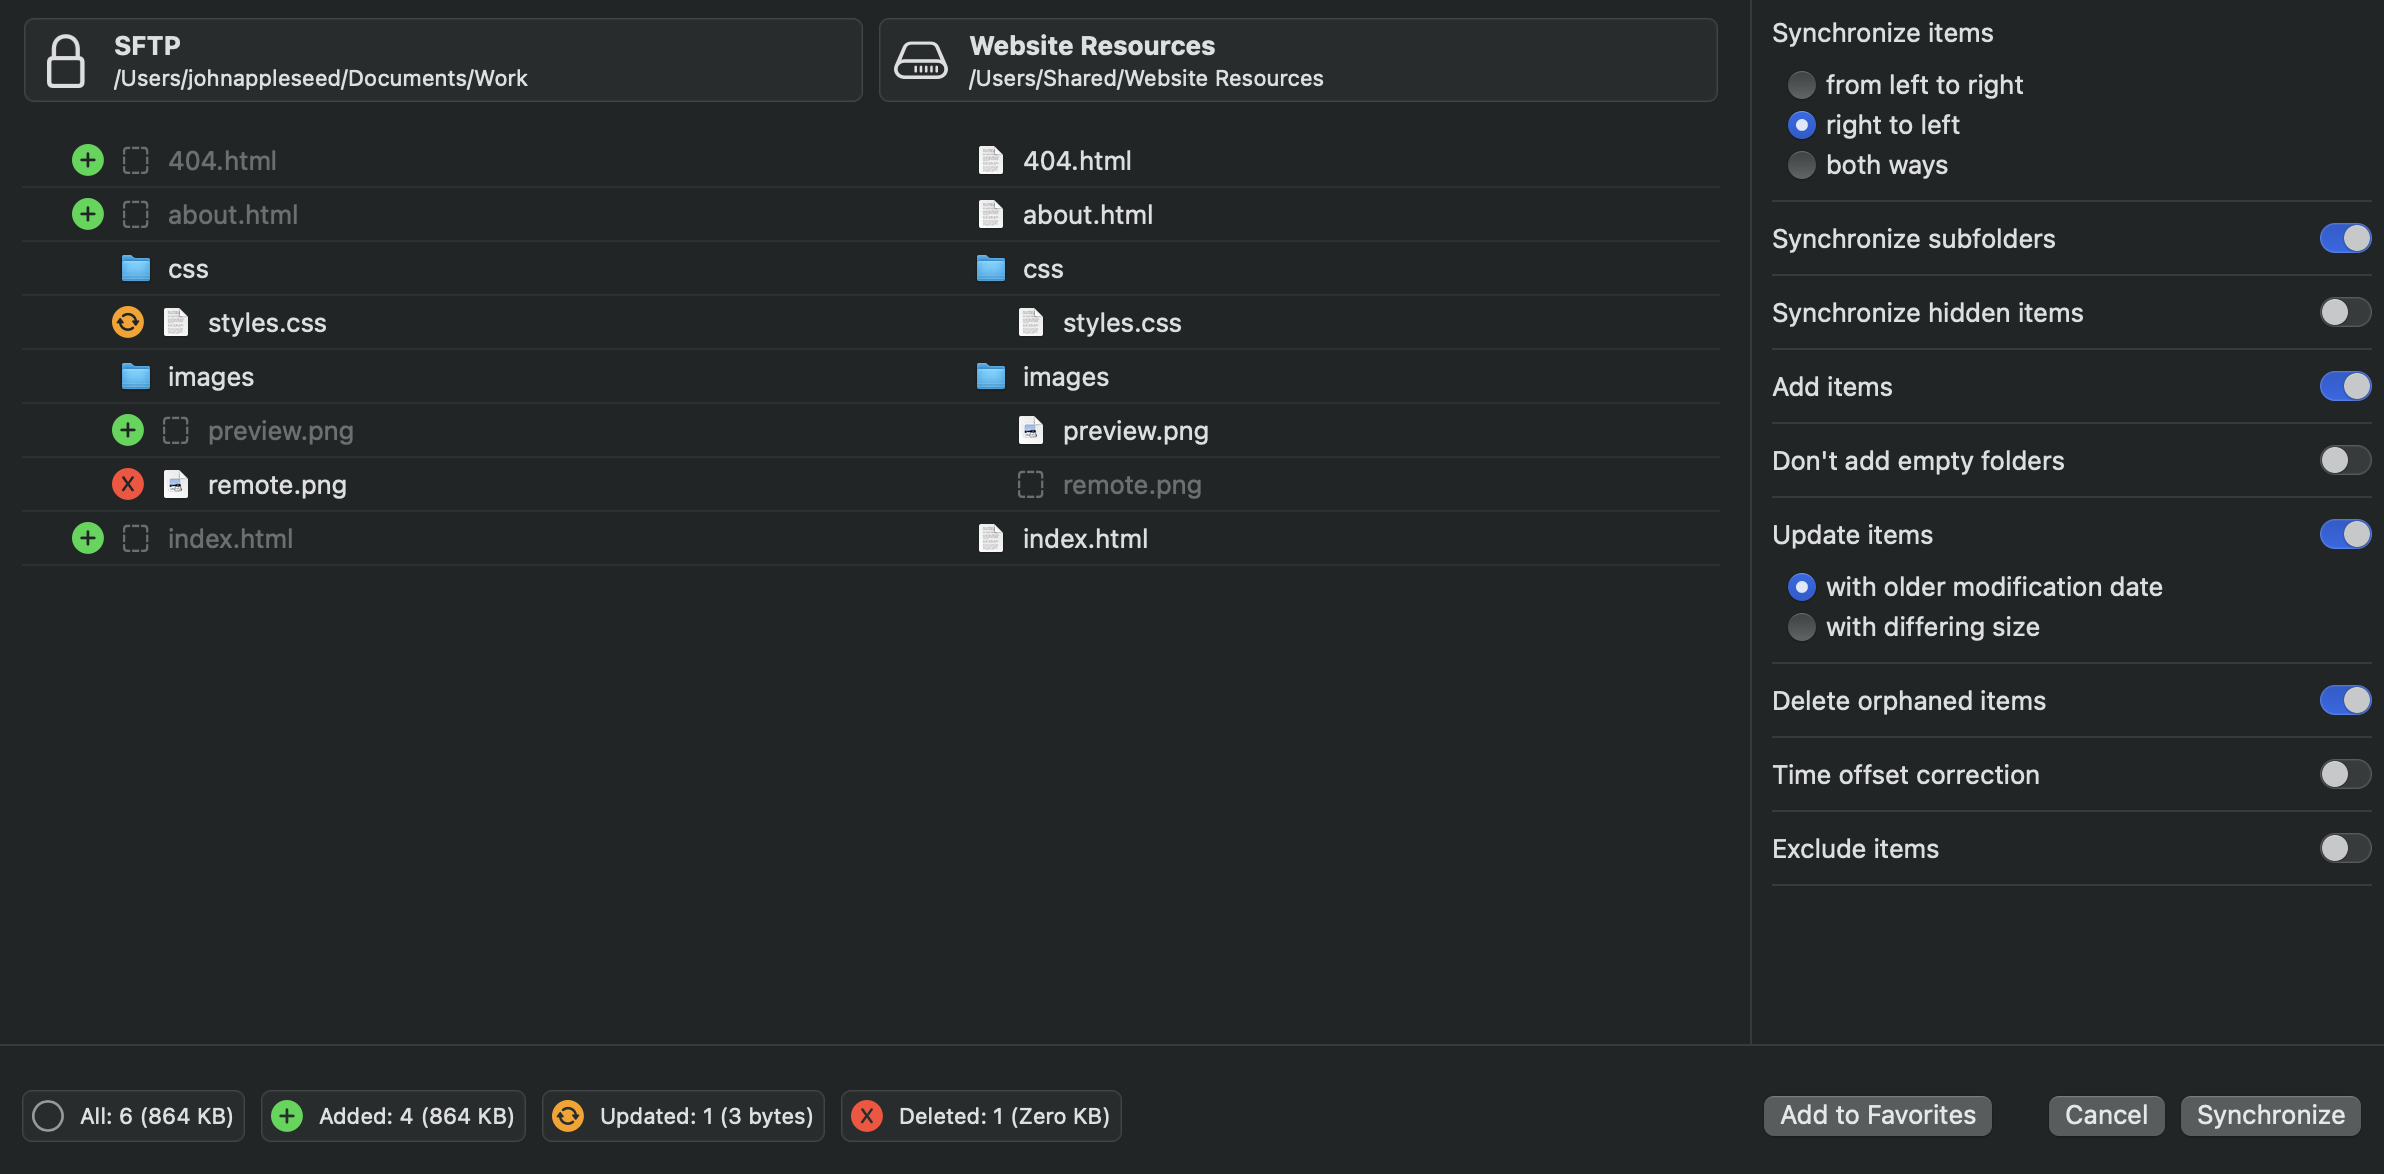
In the Sync Window you can configure the following options:
When you hover over a line with the mouse pointer, the line expands to display details such as the file path, modification date, and size. This feature proves useful when you need additional information about the items ForkLift wants to update.
At the bottom of the Sync Window, you can see the total number of files that will be changed, followed by a breakdown indicating how many items will be added, updated, and deleted during synchronization.
Simply click "Add to Favorites" to save your configuration as a Synclet. These Synclets will be added to the sidebar as favorites, allowing you to perform synchronization by clicking them. If you need to make changes to a Synclet, right-click it in the sidebar and select the "Edit" option.
Multi-renaming, or batch renaming is a powerful tool for maintaining organization and consistency in your files. It allows you to efficiently rename multiple files at once, saving time and ensuring your files are named in a way that makes sense for your workflow.
To start renaming multiple files, simply select more than one file and press Enter, or select Rename from the right-click context menu or the Commands menu. To add a new file renaming rule, click the plus sign in the sidebar of the Multi-Rename Window. To remove a rule, click the minus sign. To rename the files, click the "Rename" button.
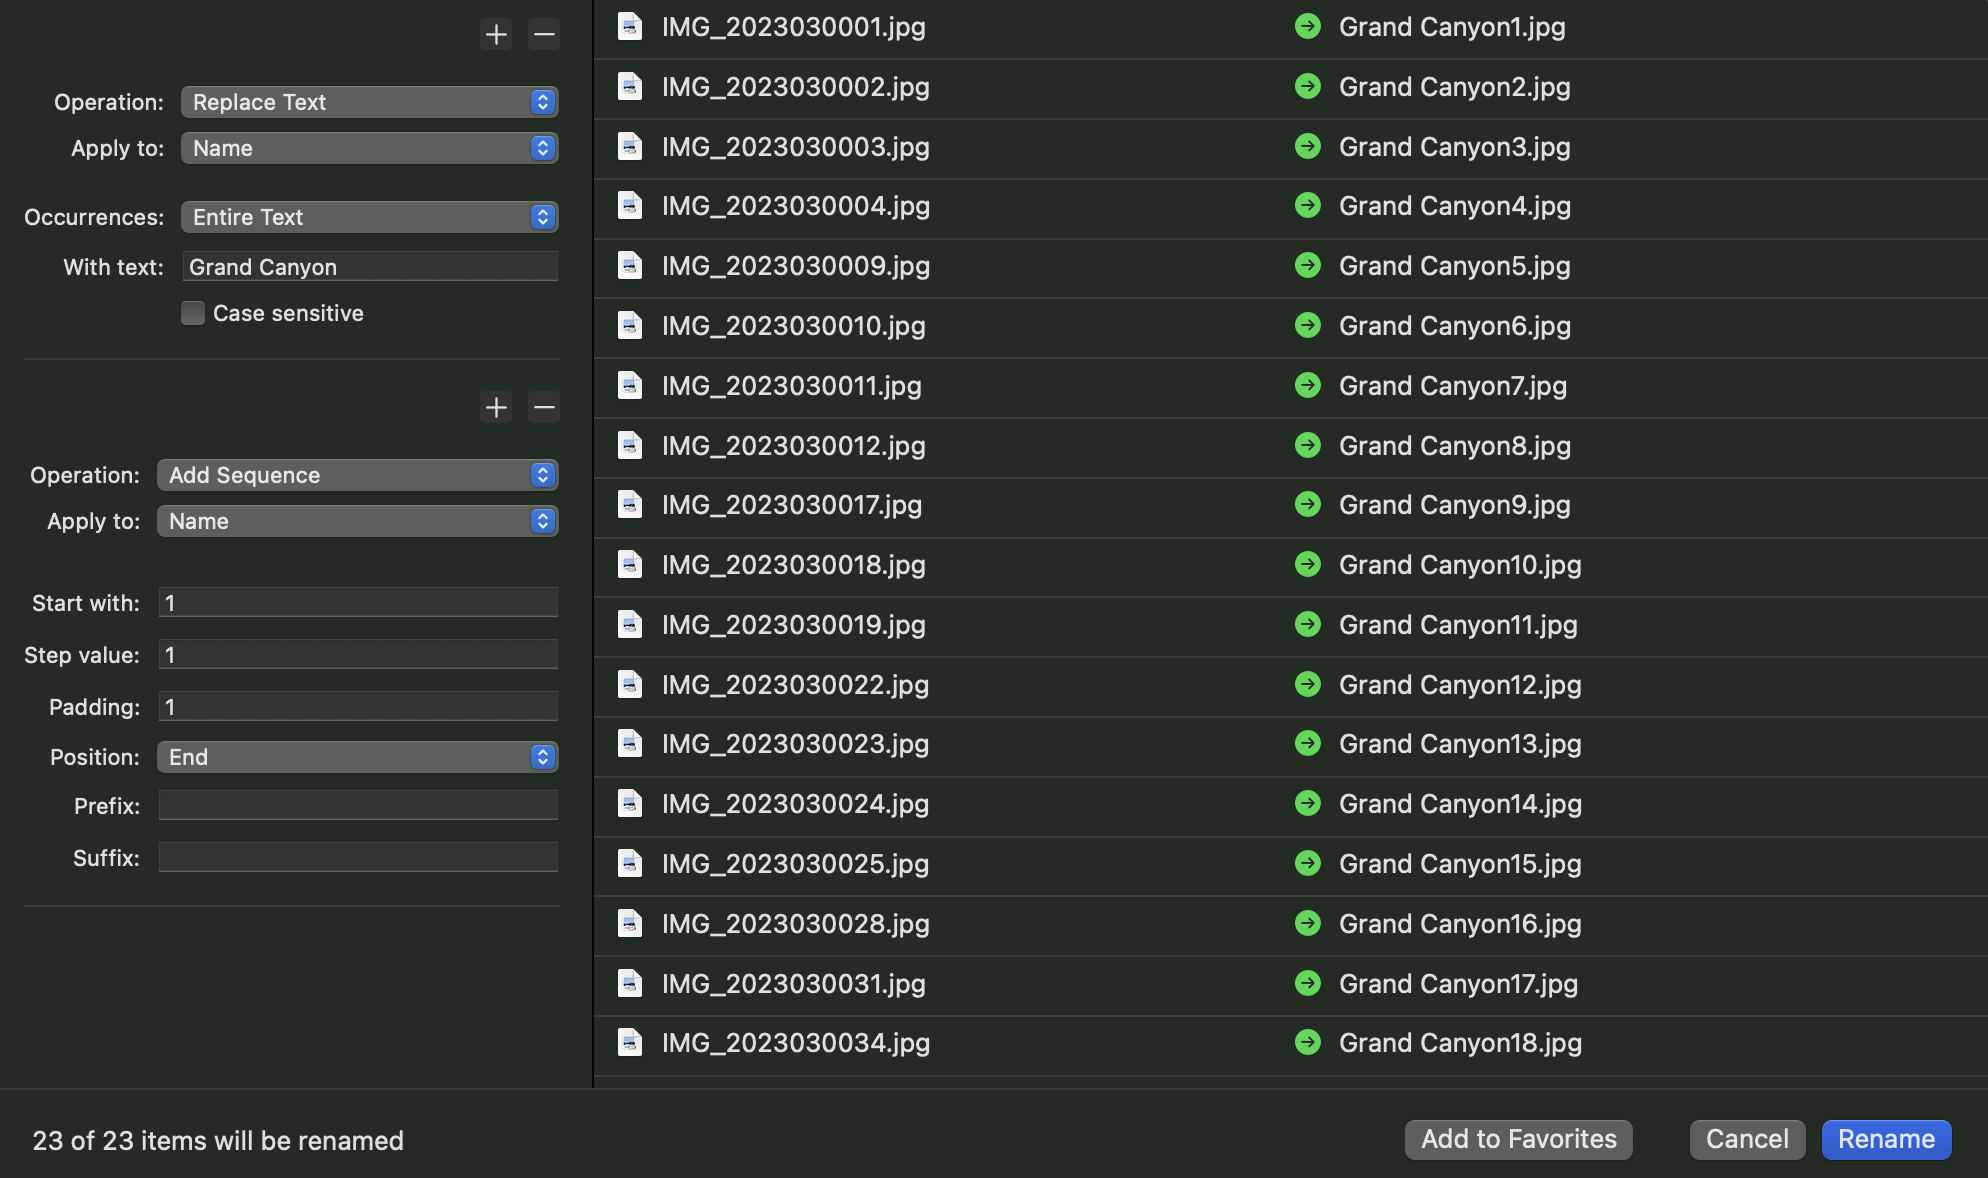
With the batch rename tool you can:
To save your multi-rename preset as a favorite in ForkLift 4, simply click "Add to Favorites." These multi-rename favorites will be conveniently stored in the sidebar for quick access. To utilize a saved favorite, select multiple files, click the corresponding favorite in the sidebar, and the batch rename window will open. Here, you can review and adjust your settings before starting the renaming process by clicking "Rename." If you prefer an automatic renaming, you can effortlessly drag and drop the selected items onto the rename favorite in the sidebar.
Remove apps completely, including their associated preference files and residual data. App Deleter in ForkLift assists you in identifying and removing all files and folders related to unused applications, ensuring a thorough cleanup.
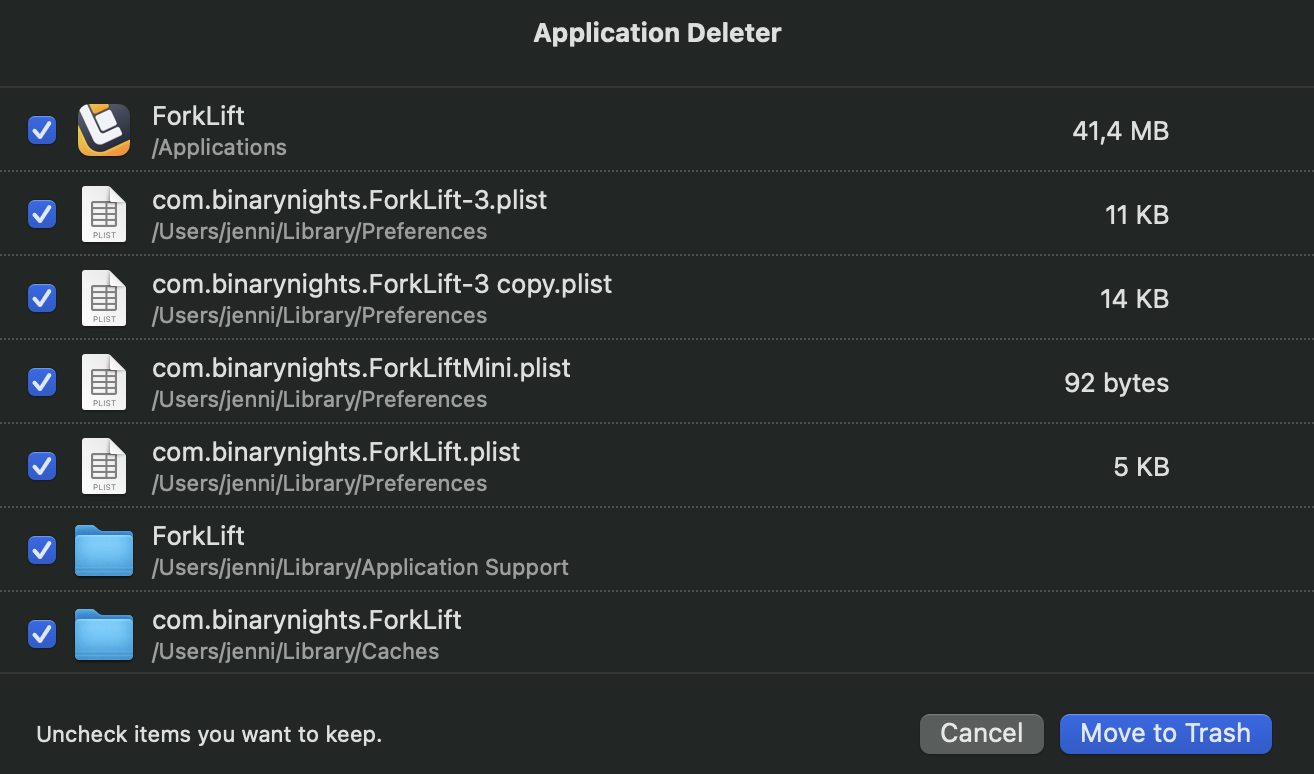
To make use of the App Deleter feature in ForkLift, ensure it's enabled under ForkLift > Settings > General > Detect application when deleting.
To remove an app:You can set ForkLift 4 as default file viewer, and almost every app (except the Desktop) will point to ForkLift when you choose Reveal in Finder, Show in Finder, or Open in Finder options. Paste the following commands into Terminal (Applications > Utilities > Terminal) and hit Enter, then restart your Mac:
defaults write -g NSFileViewer -string com.binarynights.ForkLift;defaults write com.apple.LaunchServices/com.apple.launchservices.secure LSHandlers -array-add '{LSHandlerContentType="public.folder";LSHandlerRoleAll="com.binarynights.ForkLift";}'
If you're using the Setapp version of ForkLift, paste the following commands into Terminal (Applications > Utilities > Terminal) and press Enter, then restart your Mac:
defaults write -g NSFileViewer -string com.binarynights.forklift-setapp;
				defaults write com.apple.LaunchServices/com.apple.launchservices.secure LSHandlers -array-add '{LSHandlerContentType="public.folder";LSHandlerRoleAll="com.binarynights.forklift-setapp";}'
To verify that ForkLift is set as the default file viewer, right-click a folder inside ForkLift and select Reveal in Finder. If the folder opens inside ForkLift, then the setting is active. Note: Even when ForkLift is set as the default file viewer, it will not replace the system's open and save dialog windows.
To set Finder as the default file viewer again, use the following commands, then restart your Mac:defaults delete -g NSFileViewerdefaults write com.apple.LaunchServices/com.apple.launchservices.secure LSHandlers -array-add '{LSHandlerContentType="public.folder";LSHandlerRoleAll="com.apple.finder";}'
If you set ForkLift as the default file viewer and you remove it from your system, Finder will automatically become the default file viewer again.
If you have further questions, or want to report an issue, feel free to contact us at our support email address at support@binarynights.com or on Twitter or through our blog. Please make sure to describe the issue in as much detail as possible, explaining how we can reproduce the same issue.
If ForkLift 4 crashes, please ensure that you send us the crash report through the Crash Reporter inside ForkLift. Additionally, don't forget to include a comment describing what you were doing before ForkLift crashed. Your input helps us improve the software. Thank you!
 Binarynights